 By Madsen Lake
Starting a yoga practice can feel intimidating. Between the complex-looking poses, Sanskrit terminology, and images of extreme flexibility on social media, it is easy to assume that yoga is only for the naturally bendy. However, yoga is a practice designed for every body type, age, and fitness level. At its core, yoga is not about touching your toes; it is about what you learn on the way down.
For absolute beginners, the goal is to build a foundation of body awareness, strength, balance, and mindful breathing. You do not need expensive gear, and you do not need to be flexible to start. All you need is a comfortable space and a willingness to explore how your body moves.
Here are seven foundational, accessible yoga poses that will help you kickstart your practice safely and confidently.
1. Mountain Pose (Tadasana)
Mountain Pose is the blueprint for almost every standing posture in yoga. While it may look like you are simply standing still, it is an active pose that engages your entire body and improves your posture, alignment, and focus.
How to Do It
-
Stand with your big toes touching and your heels slightly apart, or keep your feet hip-width distance apart if that feels more stable.
-
Distribute your weight evenly across the four corners of your feet.
-
Engage your thighs, draw your belly button slightly in toward your spine, and roll your shoulders up, back, and down.
-
Let your arms hang naturally by your sides with your palms facing forward.
-
Keep your chin parallel to the floor and soften your gaze or close your eyes.
Why It Matters
Tadasana helps you find your center. It teaches you how to ground yourself through your feet and stack your bones in perfect alignment, which reduces strain on your joints and muscles during daily activities.
2. Child Pose (Balasana)
Child Pose is the ultimate resting posture in yoga. It provides a gentle stretch for the back, hips, and shoulders while acting as a safe haven whenever you feel overwhelmed or fatigued during a practice.
How to Do It
-
Kneel on the floor, bring your big toes together to touch, and sit back on your heels.
-
Separate your knees about as wide as your yoga mat.
-
Exhale and lower your torso down between your thighs, resting your forehead gently on the mat.
-
Extend your arms long in front of you with your palms facing down, or drape them alongside your thighs with your palms facing up.
-
Breathe deeply into your back and ribcage, allowing your chest to sink toward the floor with every exhale.
Why It Matters
This pose calms the nervous system, relieves tension in the lower back, and provides a restorative mental break. It is a reminder that you can always pause and reset whenever your body demands it.
3. Downward-Facing Dog (Adho Mukha Svanasana)
Perhaps the most famous yoga posture, Downward-Facing Dog is an all-in-one stretch that strengthens the upper body while lengthening the hamstrings, calves, and spine.
How to Do It
-
Start on your hands and knees in a tabletop position, with your wrists directly under your shoulders and knees under your hips.
-
Walk your hands a few inches forward and spread your fingers wide, pressing firmly through your palms and knuckles.
-
Tuck your toes, exhale, and lift your knees off the floor, reaching your hips up and back toward the ceiling.
-
Keep a slight bend in your knees if your hamstrings feel tight; the priority is maintaining a straight, long spine rather than forcing your heels to touch the floor.
-
Relax your neck and let your head hang between your upper arms.
Why It Matters
Downward-Facing Dog builds strength in your hands, wrists, shoulders, and core while offering the benefits of a mild inversion, which boosts blood circulation and relieves fatigue.
4. Warrior II (Virabhadrasana II)
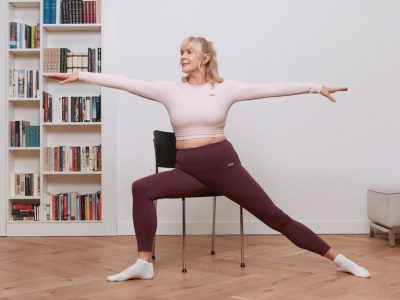
Warrior II is a powerful standing posture that builds lower body strength, opens the hips, and fosters a sense of inner determination and focus.
How to Do It
-
Stand facing the long side of your mat and step your feet wide apart, about three to four feet.
-
Turn your right toes out 90 degrees to face the front of the mat, and turn your left toes slightly inward.
-
Inhale and raise your arms parallel to the floor, extending them actively out to the sides at shoulder height with your palms facing down.
-
Exhale and bend your right knee, tracking it directly over your right ankle. Keep your back leg straight and strong.
-
Gaze out over the middle finger of your right hand, keeping your torso upright and shoulders relaxed.
Why It Matters
This pose strengthens the quadriceps, glutes, and ankles while stretching the inner thighs and chest. It teaches patience, endurance, and physical stability.
5. Tree Pose (Vrksasana)
Tree Pose is an accessible introduction to balancing postures. It challenges your stability, builds focus, and strengthens the stabilizers in your ankles and feet.
How to Do It
-
Begin in Mountain Pose with your feet firmly planted.
-
Shift your weight onto your left leg while keeping it strong and straight.
-
Lift your right foot and place the sole against the inside of your left ankle (using your toes as a kickstand), your calf, or your inner thigh. Avoid placing the foot directly on the knee joint.
-
Bring your hands together in a prayer position at your chest, or extend your arms upward like branches.
-
Find a steady, unmoving point on the floor or wall in front of you to hold your gaze.
Why It Matters
Balancing postures sharpen your concentration and quiet a busy mind. Tree Pose specifically tones the core and leg muscles while helping you cultivate a calm presence under pressure.
6. Cobra Pose (Bhujangasana)
Modern lifestyle habits often lead to rounded shoulders and a slouched back. Cobra Pose is a gentle backbend that counteracts this posture by strengthening the spine and opening the chest.
How to Do It
-
Lie down on your stomach with your legs extended straight behind you, tops of the feet pressing into the floor.
-
Place your hands flat on the mat directly under your shoulders, hugging your elbows close to your sides.
-
On an inhalation, press down through your pelvis and the tops of your feet as you gently lift your chest off the floor.
-
Keep your neck long by looking slightly forward and down, avoiding the temptation to crank your chin up.
-
Use the strength of your back muscles to lift, keeping minimal weight in your hands.
Why It Matters
Cobra Pose expands the lungs, enhances respiratory capacity, stimulates abdominal organs, and relieves stiffness in the lower and middle back.
7. Corpse Pose (Savasana)
Often considered the most crucial pose of any yoga practice, Corpse Pose is a systematic relaxation posture that allows your body and mind to integrate the benefits of your physical efforts.
How to Do It
-
Lie flat on your back with your legs extended long and your feet falling open naturally to the sides.
-
Place your arms a few inches away from your torso with your palms facing upward.
-
Close your eyes and take a deep, cleansing breath in through your nose, then let it out through your mouth.
-
Release all muscular tension from your jaw, forehead, shoulders, fingers, and toes.
-
Remain still and breathe naturally for five to ten minutes.
Why It Matters
Savasana transitions your nervous system from a state of action to a state of deep rest and recovery. It lowers blood pressure, reduces anxiety, and leaves you feeling refreshed.
Frequently Asked Questions
What should I wear to my first yoga session?
Wear comfortable, breathable clothing that allows you to move freely without restriction. Form-fitting athletic wear like leggings, yoga pants, or fitted t-shirts work best because they stay in place when you bend forward or upside down. Avoid wearing bulky hoodies, restrictive jeans, or excessively loose clothing that might slide over your face during inverted poses. You will practice barefoot, so special footwear is not required.
How long should an absolute beginner hold each yoga pose?
For your first few practices, try holding each static pose for three to five deep breaths, which equates to roughly 15 to 30 seconds. Holding poses for this duration gives your body enough time to find proper structural alignment and allows your nervous system to adjust to the stretch without overexerting your muscles. As you develop stamina and strength, you can gradually increase the duration to a minute or longer.
Is it normal to experience pain or discomfort during yoga?
There is a distinct difference between the mild, productive discomfort of stretching tight muscles and actual sharp pain. You should feel a gentle pulling sensation or a warm muscular challenge, but you should never experience sharp, shooting, pinching, or throbbing pain. If a pose hurts, back out of the posture immediately. Yoga is a practice of listening to your body and respecting its boundaries.
Do I need to be flexible to start practicing yoga?
Saying you are too tight or inflexible to practice yoga is like saying you are too dirty to take a bath. Increased flexibility is an outcome of yoga, not a prerequisite. The practice meets you exactly where you are. Over time, consistent yoga practice will lengthen your tight muscle fibers, increase the range of motion in your joints, and improve your overall mobility.
How many times a week should a beginner practice yoga to see results?
For beginners, consistency is much more valuable than duration. Practicing for 15 to 20 minutes three times a week is far more beneficial than doing one grueling two-hour class once a week. Even a short, daily 10-minute routine can yield noticeable improvements in your mental clarity, posture, and flexibility within just a few weeks.
Can I practice yoga if I have a pre-existing medical condition?
Yes, yoga can be adapted for individuals with various medical conditions, but it is critical to consult your primary healthcare physician before starting. If you have chronic conditions such as high blood pressure, severe back injuries, glaucoma, or joint issues, certain movements might need modification or complete avoidance. Always inform your yoga instructor about any injuries or health concerns before a class begins.